
The control starts up in Incremental jog mode. In order to jog the axes in continuous movement, you need to press the INCR/CONT key to switch from incremental to continuous jog mode.
May 2014 Update
The Machine Home position is fully X+ (table north), Y+ (head up), Z+ (quill in) and W+ (platen out).
|
The control starts up in Incremental jog mode. In order to jog the axes in continuous movement, you need to press the INCR/CONT key to switch from incremental to continuous jog mode. |
You can control spindle rotation speed and direction manually with jog panel keys, or automatically with program codes.
The spindle must be in Auto mode in order to use programmed M and S codes. The spindle must be in Manual mode in order to use the jog panel keys.
 |
Switch between Auto and Manual control modes. |
In manual mode, you can control operation and direction with these keys:
 |
Select spindle forward (CW) |
 |
Select spindle reverse (CCW) |
 |
Start spindle |
 |
Stop spindle |
In Auto mode, you can control operation and direction with these codes:
| M3 | Start spindle forward (CW tool) |
| M4 | Start spindle reverse (CCW tool) |
| M5 | Stop spindle |
| Snnn | Set speed to nnn RPM |
In either mode, you can further control speed with these keys:
 |
Increase speed |
 |
Set speed to 100% of programmed speed (Auto mode) or to half of maximum speed (Manual mode) |
 |
Decrease speed |
The machine has a hydraulically shifted 16-speed gearbox. Only four of the 16 speeds are used.
Gear shifting is always done with M functions, either in a CNC program or at the MDI prompt:
M44 |
High range (498-1800 RPM) |
| M43 | Medium-high range (134-498 RPM) |
| M42 | Medium-low range (37-134 RPM) |
| M41 | Low range (1-37 RPM) |
| M49 | Shift to best range for programmed RPM |
In automatic operation, the M3 and M4 codes call M49 at every spindle start, automatically shifting ranges as needed.
You only need to enter M41 - M44 for manual operations.
It is possible to run slower than the minimum for each range listed above. For example, the minimum possible speed in high range is about 36 RPM. Thus extra shifting can be avoided, as long as full torque is not required.
The power drawbar can be operated any time the spindle is stopped, with these keys:
 |
Unclamp Tool |
 |
Clamp Tool |
In high gear, the drawbar motor may tend to rotate the spindle. In lower gear ranges there is generally enough resistance in the drive train to prevent this. When changing tools in high range, you may wish to engage the spindle latch. To do this, disengage the spindle, activate the latch, and turn the spindle until the latch drops in.
In some circumstances you may want to positively lock the spindle, or disengage the transmission from the motor, or take the transmission out of gear.
 |
Disengage/engage spindle clutch (LED on = clutch disengaged) |
 |
Orient and latch spindle (LED on = spindle latched) (LED blinking = latch powered but not yet seated) |
Note that since the May 2014 update, Aux6 is an actively powered operation: the control will drive the spindle motor at low speed until the orientation latch engages.
 You can also free the spindle by turning the knob on the
headstock to a neutral position (3:00 or 9:00).
You can also free the spindle by turning the knob on the
headstock to a neutral position (3:00 or 9:00).
To re-engage the transmission after freeing it in this manner, turn the knob back to an engaged position (12:00 or 6:00).
Disengaging the transmission with the engage knob is more effective than freeing the clutch with Aux3, because the engage knob temporarily forces the shifter 'B' slide to its center position (out of gear).
There are axis holding clamps on the X (table), Y (head) and W (platen) axes. You can apply and release the clamps with the following M functions:
M32 |
Clamp X axis |
M33 |
Unclamp X axis |
M34 |
Clamp Y axis |
M35 |
Unclamp Y axis |
M36 |
Clamp W axis |
M37 |
Unclamp W axis |
When you apply an axis clamp with M32, M34 or M36, the corresponding servo motor is disabled (powered off).
When you release an axis clamp with M33, M35 or M37, the corresponding servo motor is reenabled (powered on)
The clamps will all automatically be released (unclamped) at the start of any program cycle, and also upon any attempt to move a clamped axis.
The X axis clamp is operated by a gear motor in the Northeast corner of the table. It remains in its last-driven position indefinitely, until driven to a different position.
The Y axis clamp is operated by hydraulic solenoids in the upper face of the headstock. It remains in its last-driven position indefinitely, until driven to a different position. It can also be clamped or unclamped manually with a 1/2" Allen key.
The W axis clamp is operated by hydraulic solenoids at either end of the table. It resets to be Unclamped each time the control is powered on.
The work light is switched with the rotary switch on the top right of the headstock.
The machine can perform rigid tapping, making use of the optical pulse coder on the back of the spindle.
Tapping should be performed only in certain speed ranges, and will give the most accurate depths in certain narrower speed ranges, in each gear.

| Low Range (M41) |
1 - 19 RPM | Tapping possible |
| 20 - 24 RPM | Best results | |
| 25 - 37 RPM | Tapping possible | |
| Low Mid Range (M42) |
38 - 74 RPM | Tapping possible |
| 70 - 75 RPM | Best results | |
| 76 - 100 RPM | Tapping possible | |
| 110 - 134 RPM | Tapping not possible | |
| High Mid Range (M43) |
135 - 250 RPM | Tapping possible |
| 250 - 260 RPM | Best results | |
| 270 - 498 RPM | Tapping not possible | |
| High Range (M44) |
499 - 1880 RPM | Tapping not possible |
The optical pulse coder is very sensitive to contamination. Oil drips on the wheel can interfere with the optical sensors, causing a loss of counts and incorrect thread lead (short travel).
Periodically clean the wheel with electronic contact cleaner and canned air, to remove any debris or oil from between the teeth.
Most servo drive parameters are set to factory defaults.
The following parameters are set to values other than factory defaults:
| Parameter | Value | Meaning |
| Pn000 | 0000 | Velocity control mode |
| Pn001 | 0020 | Active decel to stop on overtravel |
| Pn10B | 0004 | Disable mode switching |
| Pn110 | 0012 | Disable online auto-tuning |
| Pn201 | 16384 | Encoder output cycles/revolution |
| Pn300 | 800 | Volts (x100) for rated speed |
| Pn50A | 8100 | Disable P-OT input |
| Pn50B | 6548 | Disable N-OT input |
| Pn50E | 3200 | Remove /COIN and /V-CMP from output SO1 |
| Pn50F | 0100 | Put /BK (brake release) on output SO1 |
See the Yaskawa Sigma II series user manual for detailed information on these and other servo drive parameters.
Most spindle drive parameters are set to factory defaults.
The following parameters are set to values other than factory defaults:
| Parameter | Value | Meaning |
| P 0.01 | 26 A | Rated motor current (FLA) |
| P 0.02 | 60 Hz | Rated motor frequency |
| P 0.03 | 1770 RPM | Rated motor speed |
| P 0.04 | 2700 RPM | Maximum desired motor speed |
| P 0.06 | 220 milliohm | Motor R1 resistance |
| P 0.07 | 14.5 A | Motor no-load current |
| P 1.00 | 0 | Select ramp-to-stop |
| P 1.01 | 4.0 s | Accel time |
| P 1.02 | 5.0 s | Decel time |
| P 2.10 | 2 | Control method (2 = open loop vector) |
| P 3.00 | 1 | Use terminals for command source |
| P 3.12 | 1 | DO1 function (1 = fault) |
| P 3.14 | 3 | DO3 function (3 = zero speed) |
| P 4.13 | 5 | Second frequency command source |
| P 4.00 | 2 | Primary frequency command source |
| P 4.02 | 0 % | Analog reference offset |
| P 4.03 | 100 % | Analog reference gain |
| P 4.11 | 1 | Output current monitor on AO |
| P 4.12 | 200 % | Analog output gain |
| P 6.05 | 1 | Disable over-voltage stall prevention |
See the GS3 user manual for detailed information on these and other spindle drive parameters.
Note that the voltage jumper in the GS-4DBU dynamic braking control unit is set on the 440V position, even though the actual service voltage is slightly over 480VAC. This is necessary so that dynamic braking will begin before the GS3 drive faults due to overvoltage.
The PLC program can report various error and fault conditions, in addition to those listed in the Centroid operator's manual.
You can use the PLC Diagnostic display on the console to view some of the Centroid PLC input, output and memory locations mentioned with these error and fault conditions. At the control's main screen, press Alt-I to activate the PLC Diagnostic display. Press Alt-I again to dismiss it.
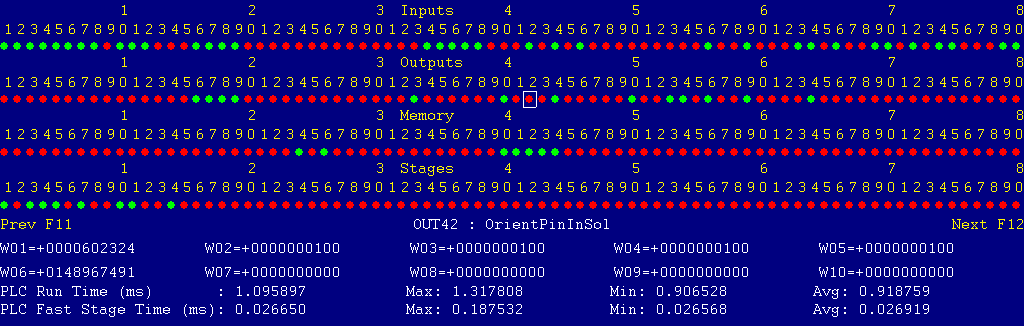
Each page of the Diagnostic display shows four rows of red and green dots: the first row shows PLC inputs 1 through 80; the second row PLC outputs 1 through 80; the third row PLC memory bits 1 through 80; and the fourth row PLC program stages 1 through 80.
You can use the arrow keys to move a highlight box over any of these locations. The name of the highlighted location will be displayed in the center of the screen below the red and green dots.
For example, in the illustration above the highlight box is on Output #42: The dot below the 2, to the right of the superscript 4, on the second line.
Below the four rows of bit status information are ten numeric ("word") variable values, labeled W1 through W10. Some of these variables also hold useful status information, described with the error and fault conditions to follow.
There are multiple pages of Diagnostic data. With the Alt-I diagnostic display showing, you can use the F12 and F11 keys to scroll right and left. For example, pressing F12 once will shift to the page showing inputs and outputs 81 through 160, and word variables W11 through W20.
You can also check PLC input states by viewing the LED indicators on the main PLC unit (PLCIO2) and the Auxiliary PLC (Click). On both those devices, a lighted LED indicates a closed input. The PLCIO2 also has LED indicators for all of its outputs (the on-board relays and the open-collector drivers which control the external relay boards). A lighted LED indicates a closed (active) relay.
Most fault conditions must be cleared by pressing the Emergency Stop button. Fault conditions have 9000-series message numbers.
Non-fault Error conditions generally cancel the program cycle and stop the spindle and coolant, but do not then need to be explicitly reset. Non-fault Error conditions have 8000-series message numbers.
Warnings and informational messages have 5000-series and 2000-series message numbers. They do not cancel the cycle or require any action to reset.
The MPU11 motion controller detected loss of fiber optic communication from the PLCIO2 interface unit.
Check the optical fibers. Verify that they have not been bent, kinked, or pulled loose from their sockets. Verify that they are both plugged into the correct sockets (1 to 1 and 3 to 3, on both boards).
Verify that the expected input LEDs on the PLCIO2 unit are lit. If no LEDs are lit on the PLCIO2 unit, check its logic power, from power supply PS2.
The GS3 spindle drive unit is reporting a fault condition.
Press and release Emergency Stop to clear the fault.
Check the fault history on the LED display on the spindle drive itself for a fault code. The last six faults are stored in P6.31 through P6.31. To review the fault history through the GS3 keypad:
References:
PLC INP18:	indicates spindle drive state: Red = 0 = okay; Green = 1 = fault
Schematic:	Lines 32, 84
The MPU11 board is not receiving communication from the jog panel in the console.
Check the jog panel cable connection at the MPU11 board and inside the back of the console.
Press and release Emergency Stop to clear the fault.
The jog panel reports that it is not receiving communications from the MPU11 board.
Check the jog panel cable connection at the MPU11 board and inside the back of the console.
Press and release Emergency Stop to clear the fault.
You attempted to start the spindle running with the DP4 spindle probe in place.
Remove the probe from the spindle and unplug the probe cable.
Press and release Emergency Stop to clear the fault.
The Trabon Maxi-Monitor lube controller is reporting a fault condition. This probably means that it did not see a "lube cycle complete" closure after a certain amount of time cycling the lube pump solenoid.
The most likely cause is low lube in the tank (causing the float switch to open).
It could also be caused by an opening or blockage in the lube system, so that the plunger on the final shuttle valve never activates switch 56LS.
Investigate possible causes. Press and release Emergency Stop to clear the fault.
References:
PLC OUT10:	momentary start signal to lube unit: Green = 1 = start
PLC OUT30:	power to lube unit: Green = 1 = on, enabled
PLC INP12:	indicates lube fault relay state: Green = 1 = okay ; Red = 0 = fault
Schematic: Lines 81, 130, 137, 182, 183
You exited the CNC11 control software without first pressing Emergency Stop.
Press and release Emergency Stop to clear the fault.
The hydraulic system is running, but pressure switch 1PS on the South side of the column has not closed to indicate adequate pressure for the lubrication system and platen clamp release.
References:
Click PLC X8: indicates 1PS state: LED On = closed = pressure up, LED Off = open = low pressure
PLC word variable W17: Error code from Click PLC (7 = 1PS open)
Schematic: Line 101
One of the two hydraulic pumps has tripped the overload/overcurrent protector (MMS) on its starter. This could be due to a running overload, or to a short circuit or ground fault.
Check the rotary handles on the MMS units themselves to see which one is tripped. MMS2 controls the base hydraulic pump on the floor. MMS4 controls the headstock hydraulic pump.
If the error was a running overload (thermal trip) you will need to wait several minutes for the protector to cool before turning the rotary handle back on. Press and release Emergency Stop to clear the fault.
If the error was a ground fault or short circuit, then the blue button on the auxiliary block on the left side of the MMS will also pop out. In this case locate and repair the fault, then reset both devices before powering back up.
References:
Click PLC X3: indicates MMS2 state: LED On = closed = okay, LED Off = open = tripped
Click PLC X5: indicates MMS4 state: LED On = closed = okay, LED Off = open = tripped
PLC word variable W17: Error code from Click PLC (3 = MMS2 or MMS4 tripped)
Schematic: Lines 34, 37, 98, 99
The flood coolant pump has tripped the overload/overcurrent protector on its starter (MMS3). This could be due to a running overload, or to a short circuit or ground fault.
If the error was a running overload (thermal trip) you will need to wait several minutes for the protector to cool before turning the rotary handle back on. Press and release Emergency Stop to clear the fault.
If the error was a ground fault or short circuit, then the blue button on the auxiliary block on the left side of the MMS will also pop out. In this case locate and repair the fault, then reset both devices before powering back up.
References:
Click PLC X4: indicates MMS3 state: LED On = closed = okay, LED Off = open = tripped
PLC word variable W17: Error code from Click PLC (4 = MMS3 tripped)
Schematic: Lines 35, 99
The drawbolt motor has tripped the overload/overcurrent protector on its starter (MMS6). This could be due to a running overload, or to a short circuit or ground fault.
If the error was a running overload (thermal trip) you will need to wait several minutes for the protector to cool before turning the rotary handle back on. Press and release Emergency Stop to clear the fault.
If the error was a ground fault or short circuit, then the blue button on the auxiliary block on the left side of the MMS will also pop out. In this case locate and repair the fault, then reset both devices before powering back up.
References:
Click PLC X7: indicates MMS6 state: LED On = closed = okay, LED Off = open = tripped
PLC word variable W17: Error code from Click PLC (6 = MMS6 tripped)
Schematic: Lines 40, 100
The table (X axis) clamp motor has tripped the overload/overcurrent protector on its starter (MMS5). This could be due to a running overload, or to a short circuit or ground fault.
If the error was a running overload (thermal trip) you will need to wait several minutes for the protector to cool before turning the rotary handle back on. Press and release Emergency Stop to clear the fault.
If the error was a ground fault or short circuit, then the blue button on the auxiliary block on the left side of the MMS will also pop out. In this case locate and repair the fault, then reset both devices before powering back up.
References:
Click PLC X6: indicates MMS5 state: LED On = closed = okay, LED Off = open = tripped
PLC word variable W17: Error code from Click PLC (5 = MMS5 tripped)
Schematic: Lines 38, 100
The dynamic brake resistors for the spindle drive have overheated. Allow time for the resistors to cool, then press and release Emergency Stop to clear the fault.
References:
Click PLC X1: indicates 1TH state: LED On = closed = okay, LED Off = open = tripped
PLC word variable W17: Error code from Click PLC (1 = 1TH tripped)
Schematic: Lines 27, 97
The spindle drive dynamic brake control unit (GS-4DBU, on the right wall of the cabinet) has reported a fault.
If the drive has been performing frequent braking, allow time for the brake unit to cool. Press and release Emergency Stop to clear the fault.
References:
Click PLC X2: indicates 2TH state: LED On = closed = okay, LED Off = open = tripped.
PLC word variable W17: Error code from Click PLC (2 = DBU fault)
Schematic: Lines 27, 98
The Daikin spindle chiller should be running, but its status relay is open, indicating it is either in a fault condition or not powered up.
Check that the 208VAC disconnect supplying the chiller unit is turned on. Check the LED display on the chiller itself for possible fault codes.
Refer to the Daikin AKZ328 manual for error codes and troubleshooting advice.
Press and release Emergency Stop to clear the fault.
References:
PLC INP9: indicates chiller relay state: Green = 1 = closed =  okay, Red = 0 = open = fault or power off.
Schematic: Lines 46, 80
The hydraulic system is running, but pressure switch PS150 on the headstock hydraulic panel has not closed to indicate adequate pressure for the gear shifters, spindle clutch and head clamping system.
References:
PLC INP17: indicates PS150 state: Green = 1 = closed =  pressure up, Red = 0 = open = low or no pressure
Schematic: Lines 37, 83
A gear shift was attempted, but the gear position switches did not indicate a successful shift within a reasonable length of time.
Verify that the neutral/engage knob on the headstock is fully in an engaged position (12:00 or 6:00). Press and release Emergency Stop to clear the fault, then try the shift again. Try shifting to a different range, then back to the desired range.
References:
PLC INP24: indicates LS-AR (shifter A right) state: Green = 1 = not right, Red = 0 = right
PLC INP25: indicates LS-BR (shifter B right) state: Green = 1 = not right, Red = 0 = right
PLC INP27: indicates LS-CL (shifter C left) state: Green = 1 = not left, Red = 0 = left
PLC INP28: indicates LS-DL (shifter D left) state: Green = 1 = not left, Red = 0 = left
PLC word variable W18: Desired shifter position request, set by M41 - M44 codes (0, 5, 10 or 15)
PLC word variable W19: Current shifter position code, interpreted from above four switches (0 - 15)
Schematic: Lines 87-89, 147-154
An attempt was made to start the spindle, but the spindle orientation latch is activated or engaged.
Press Aux6 to release the orientation latch. Verify the spindle is free. Press and release Emergency Stop to clear the fault.
References:
PLC INP13: indicates LS-SLU state: Green = 1 = closed = latch engaged, Red = 0 = open = idle
PLC INP14: indicates LS-SLD state: Green = 1 = closed = idle, Red = 0 = open = latch activated (SOL-SLU on)
PLC OUT48: indicates SOL-SLU state: Green = on = latch activated, Red = off = idle
Schematic: Lines 82, 160
These messages do not indicate fault or error conditions, but provide useful information.
A previous fault condition has been reset with Emergency Stop.
All faults have been cleared and Emergency Stop is released, but the hydraulic systems have not been restarted.
Press the Aux1 key to start the hydraulic systems and spindle cooler.
The hydraulic systems have been started and the machine is ready to run.
These codes usually only need to be entered once. They are stored on the control with the Machine Parameters. They should be kept on file in case the Parameters file is ever lost.
Serial Number: 101525 -- Key A (plain): 0408140937
The following are necessary to unlock software features:
| Option | Parameter # | Parameter Value | |
| 5 | Extended WCS | 205 | 49648.8381 |
| 9 | Probing | 209 | 56816.2624 |
| 10 | Scaling | 210 | 45584.0088 |
| 15 | Rigid Tapping | 215 | 65040.1274 |
| 20 | Coordinate System Rotation | 220 | 37904.7959 |
| 20 | DXF File Import | 221 | 50192.2134 |
| 26 | Permanent Unlock | 298 | 36688.8058 |
| 27 | Intercon | 300 | 37840.1761 |
28-May-2014 MBL
![]()